
 Photographs are powerful story-telling tools. They provide interest, add a human touch, and attract attention to your writing (and even on their own). Several of our clients are non-profits and smaller companies without substantial budgets for photography. And even those who do hire professional photographers for special events or big photo shoots like to supplement those photos with snapshots they take themselves. Recently a client asked me how to make those snapshots look better. Here are 17 pointers (in three categories) that should help improve how you tell your stories with photos.
Size (resolution) does matter.
Resolution is what makes the difference between a crisp, clear image and one that is too pixelated. It is basically how much information is in the photo file.
- You can always make a photo smaller or lower resolution, but you can’t make it larger or higher resolution. You can’t add in information that is not there.
- Some cameras and camera phones give you options on resolution. If you might ever want to use a photo for a printed piece (annual report, brochure, or printed photo), you should use the highest resolution available. This does make your files sizes much larger, so you’ll need a good system for archiving your photos so you can clear up space on your device.
- Keep in mind that print resolution is four times as large as the resolution needed for screens (websites, social media, PowerPoint presentations). So if a photo looks fine at 4” x 4” on your website, it will only print well at up to 1” x 1” – around the size of a postage stamp. Any time you’re working on a document to print, be sure the send the designer the very original photo instead of a version that has been scaled down to work on a website.
- Microsoft Word and PowerPoint automatically reduce the resolution of photos pasted into the documents, so pulling a photo out of one of those programs will automatically get you a lower resolution, even if the photo started out high resolution. The same goes for saving a photograph off of a website. The file size is much too small for print.
- Some email programs give you an option for the size of the file you send. When you send a file to me or anyone else using it for print, be sure to always select “original size.” You might need to send your photos in batches or use a service like Dropbox, but it’s worth it to get a better, more professional finished piece.
- These are very rough rules of thumb for file sizes, but they should give you a general idea if your photo is large enough for the desired use.
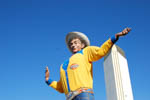
Very low resolution Big Tex
- Full sheet 8.5 x 11 approx. 9 Megapixels
- Half sheet 8.5 x 5.5 approx. 4.5 Megapixels
- Quarter sheet 5.5 x 4.25 approx. 2 Megapixels
Lighting
It’s been said that photography is the art of capturing light, and I believe the difference between a professional photographer and the rest of us is how we work with light.
- I always prefer to use natural light when possible. You might want to look around for a brighter area to place your subjects in, or if you’re outside, put them in dappled sunlight for an interesting, natural look. For a clean and simple lighting effect, put people outside in the shade.
- Don’t let people stand with their backs to the window or the sun. Put the light source towards the front of faces, not behind. It’s very hard to see a backlit face clearly, and it’s also very hard to fix those problems after the fact. If indoors, place them so they are opposite the windows.
 Walter and Cindy backlit
 Walter and Cindy across from window


- Cameras are able to take photos faster if there is plenty of light, so you’re less likely to get blurry or grainy photos.
- You might want to experiment with a flash to fill in if you can’t get enough natural light.
Composition
As much as the lighting and file size, the way you have your photo arranged can make the difference between an effective photograph and a mundane snapshot.
- When you’re taking a photo of a group of people, place them close together. It might feel funny to your models, but the photo will look much better without big blank spots in the middle, and it will work better in the eventual layout.
- Zoom in relatively closely (with your lens or with your feet) so you can get some detail in your subject. But on the other hand, leave enough extra around the main subject of the image so the designer can let it bleed off the edge of the page, if that’s what the design calls for.
- If you’re photographing a group of people with some standing in back and some sitting in front, it works much better if you have the taller people sit and the shorter people stand behind – the heads are going to be that much closer to each other, and it will look better.
- Try to position the people (or the main subject) so there isn’t too much clutter behind them. I’ve moved people (or myself) a couple inches so fire alarms or exit signs weren’t featured in the photo. And I have a pet peeve about formal dinner photos taken at a table full of dirty dishes! Yuck!
 Ari with cluttered background
 Ari with a cleaner background
 - It’s best not to have the main subject exactly in the middle of the photo.
- If someone’s head is turned to one side, I try to position the photo so the person is looking into the main part of the document (or website), not away from it.
 Adam nicely framed, draws the eye into the document
 Adam poorly framed, draws the eye away from the document
 - Ask the people in the photo to stop talking and smile for a minute. They would rather be interrupted than have a photo with their mouth in a funny position because you caught them talking.


These tips should help your own photography look much more professional. But if you’re ready to invest in high quality, professional photography, we are proud to have some of the best on the Kim Schlossberg Designs team.

- How 2020 can make 2021 better - December 28, 2020
- Welcome to the Kim Schlossberg Designs newsletter - December 18, 2020
- A Strong Brand is the Key to Resilience - April 10, 2020
